How Mecanum Wheels Work
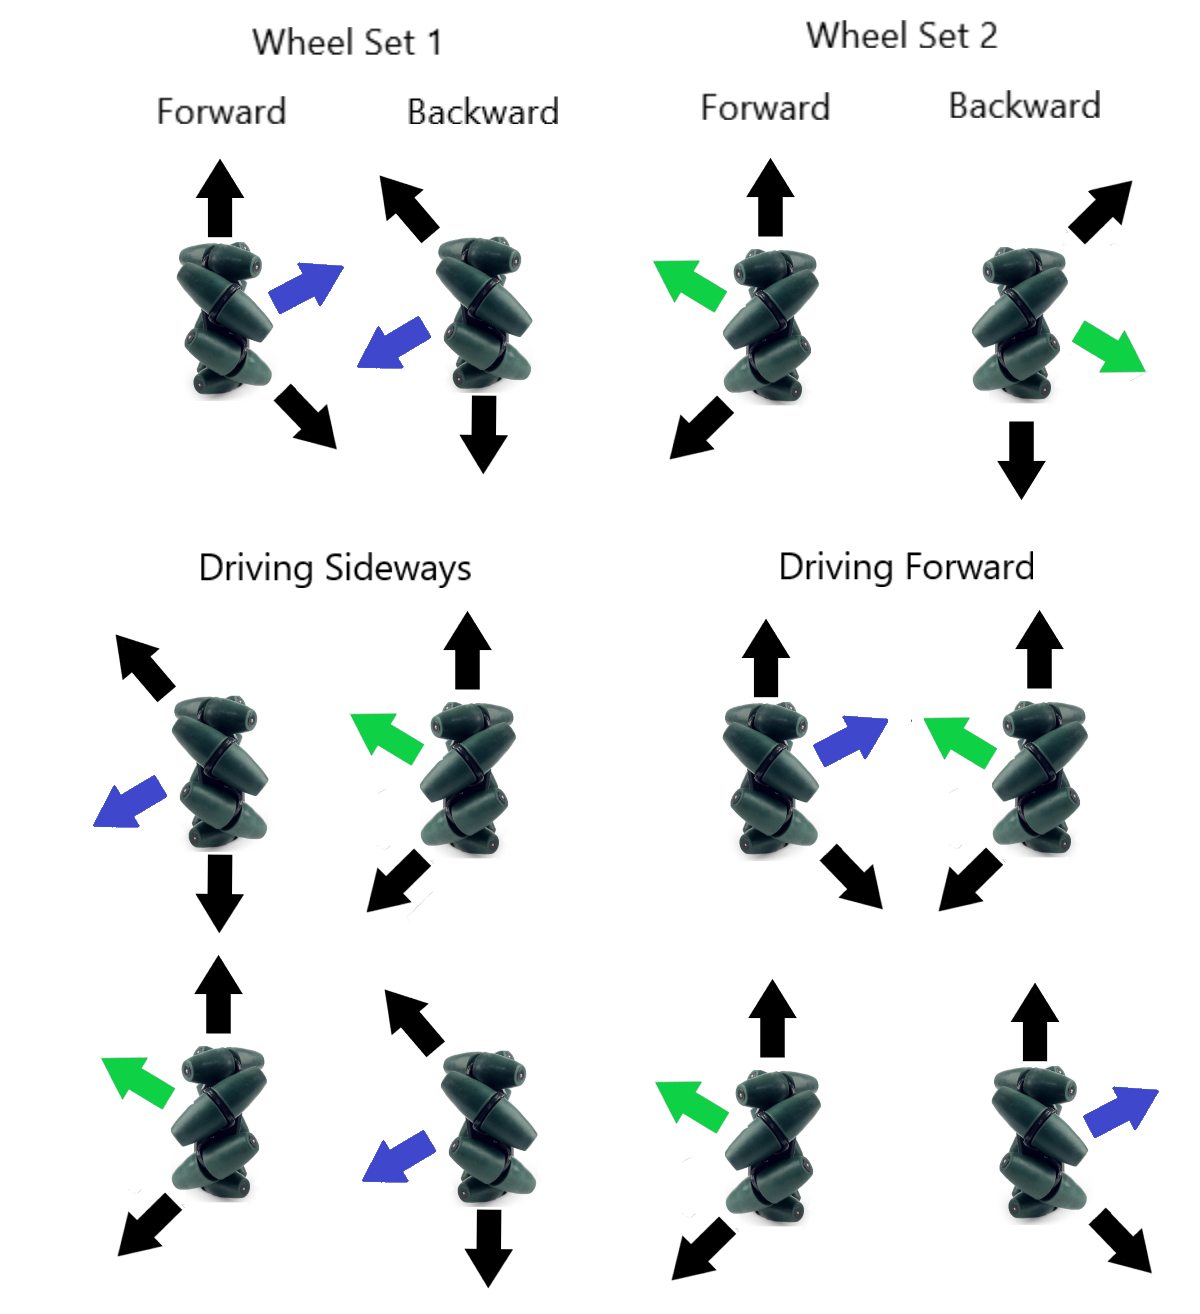
A popular alternative to the standard tetrix wheels is Mecanum Wheels. More about the advantages of these wheels can be found in the Hardware section. In short, they allow for your robot to move sideways and diagonally without turning. They do this using rollers which make them apply force diagonally when moving forward or backward. When the forces are combined, they eventually result in movement, sometimes sideways or diagonally. See the image below for a visualization. Note firstly that there are two types of Mecanum wheels which must be installed in specific locations relative to eachother. The different wheels are denoted by green or blue arrows. Secondly, note that the way the Mecanum wheels work, a lot of force is wasted. As a result, Mecanum wheels are a little slower than normal ones, meaning you will have to send more power to your motors.
Programming Mecanum Wheels
Note that Mecanum Wheels are more difficult to program, especially if you want to utilize their full functionality.
Movement forward and backwards along with turning remain the same as standard wheels. However, to move sideways, you must rotate two wheels on one side of the robot towards each other and rotate two wheels of the other side of the robot away from each other. The robot will move towards the side with the wheels facing inward. Click Here for a demonstration. If you only want sideways movement, it won’t be too difficult to program. Simply use a tank drive program on the joysticks and bind sideways movement to the d_pad.
Here’s an example for binding leftward movement to the left key of the dpad:
if(gamepad1.dpad_left.isPressed){
  leftFrontMotor.setPower(-0.5);
  leftBackMotor.setPower(0.5);
  rightFrontMotor.setPower(0.5);
  rightBackMotor.setPower(-0.5);
}
(Note that your motor names will probably differ from the example)
However, if you want to move diagonally as well, this is much more difficult. Rather than a tank drive, you must use a directional drive. This means that one joystick will control movement, in this case forward, backwards or diagonally while the second joystick will control rotation.
Note that this method will take a bit more practice to learn than tank drive, but it is still relatively easy to learn.
Unfortunately, it is much more difficult to code. Below is an example of one solution. This solution, along with others, can be found from here.
double r = Math.hypot(gamepad1.left_stick_x, gamepad1.left_stick_y);
double robotAngle = Math.atan2(gamepad1.left_stick_y, gamepad1.left_stick_x) - Math.PI / 4;
double rightX = gamepad1.right_stick_x;
final double v1 = r * Math.cos(robotAngle) + rightX;
final double v2 = r * Math.sin(robotAngle) - rightX;
final double v3 = r * Math.sin(robotAngle) + rightX;
final double v4 = r * Math.cos(robotAngle) - rightX;

leftFront.setPower(v1);
rightFront.setPower(v2);
leftRear.setPower(v3)
rightRear.setPower(v4);
Explanation of Directional Drive
This solution uses a little trigonometry. For my explanation, you will just have to know what sine, consine, hypotenuse and radians are. First, the program sets a variable r to the length of the hypotenuse of a triangle formed by two legs the length of the x and y position of one of the joysticks, in this case the left one. Note that this is essentially finding the distance and direction you are pressing the joystick.
Next, the program defines a variable named robotAngle. Here, they use atan2. This is simply a function which takes two values and creates a right triangle with them and then returns that angle formed by it. Note that when forming the triangle, it uses the first value as the vertical leg and the second as the horizontal leg. More information on atan2 can be found here. Note that because atan2 will assume 0 degrees is directly to the left of a point, which is how it is on the unit circle. To compensate for this, you may think we need to compensate 90 degrees. However, for reasons which will be discussed later, we want forward to be 45 degrees, so we only compensate by 45 degrees.
After that, a variable is created determining the x position of the right joystick. This is used to control turning. Finally, it uses these variables to set the power of the motors. It uses rightX to determine rotation by setting one side’s power to rightX and the other to negative rightX. When more is added to it, the directions just compound. For the part before rightX, it first uses r to set the speed. This is because you can not solely use the x or y position of the joystick, you need to use the distance of the joystick from its starting position, which is essentially what r is.
Now for the complicated part. The first thing that should be noticed is that because the left term (ex.Math.cos(robotAngle)) of the equation never should be affected by turning, the wheels diagonal to each other will have the same value for this left term. Secondly, if the left analog stick is moved to its rightmost, leftmost, topmost, or bottommost position, the “robotAngle” will be a variant of 45 degrees, meaning that the cos and sin have the same absolute value. This should happen, as if they didn’t, that would mean the powers going to the motor aren’t equal, resulting in the robot moving diagonally. Thirdly, note that moving the joystick between these points will result in the robot moving at an angle between these two values.
If the explanation is unclear, simply plug in a few angles for where the left joystick is assuming the right joystick doesn’t exist. You should find that the direction the robot is predicted to move should more or less match the direction the joystick is pointed in.
If you still don’t understand, go ahead and use the code anyway, as you don’t need to know exactly how the code works right now, or click here for another explanation of how the drive works.
Works Cited
https://www.youtube.com/watch?v=Ne09Y72zW_Y
https://ftcforum.usfirst.org/forum/ftc-technology/android-studio/6361-mecanum-wheels-drive-code-example
https://www.tutorialspoint.com/java/number_atan2.htm
http://thinktank.wpi.edu/resources/346/ControllingMecanumDrive.pdf