General Info
Source control has two main functions: firstly, it allows multiple people to work on the same project. Secondly, it allows for you to manage changes by letting you view and revert changes. Most teams use github to do source control and this tutorial will focus on github, but there are a few other methods of source control if you are interested.
Prerequisites
Aside from Android Studio, you need to install git and have a github account.
- Github link: https://github.com/
- Git download: https://git-scm.com/
Second, you need to have your project on github. You can do this in Android Studio by going to VCS > Import into Version Control > Share Project on Github. However, it is much better to fork the ftc_app program, as this makes it easier to update the SDK without having to move all of your files. Do this by going to the ftc_app page on github, link here, then clicking the fork button in the upper right corner. If you already have code, you may need to push it into the repository you just forked.
Connecting to your repository
To connect your Android Studio to the github repository, you need to get to the Android Studio welcome menu. Do this by saving your project, then go to File > Close Project. This welcome menu will automatically open. Click the “Check Out Project from Version Control” to open its menu, then click github. It should then open a window. In the field labeled “Github Repository URL” paste the link to your repository. The parent directory is where you will store the local version of this repository. Remember it, as it is the only way to access your program outside of Android Studio. The directory name will be the name of your local copy. It does not have to be the same as the copy on github.
Basics
The three most common git commands are the commit, push and pull. The order used most often is commit, pull, and push. This will simultaneously move changes from your local repository to github, update your local repository and merge/rebase to resolve any conflicts. You don’t really need to know how this works, but it you want, you can read on to get a basic idea of what these do.
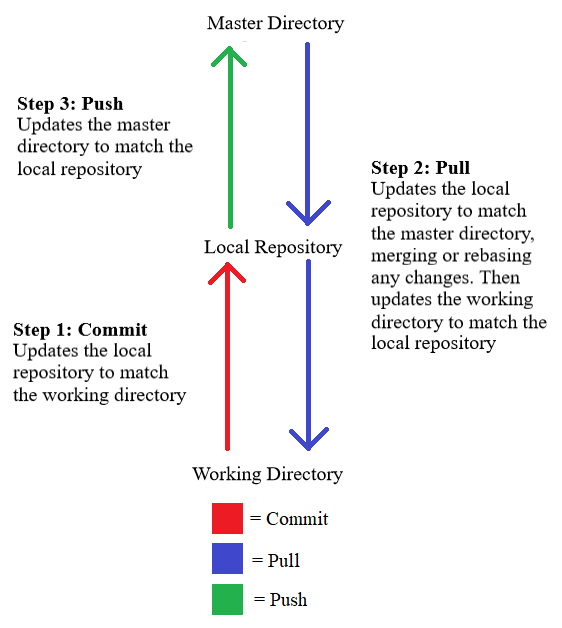
Committing
A commit moves your changes from your working directory (the thing you change using Android Studio) to your local repository (the place where the git files are stored). This allows for github’s version control to be a distributed version control, meaning that each developer has their own repository (your local repository), allowing for merges and rebases to be easier and many other advantages. For more information check out the wikipedia page [here] (https://en.wikipedia.org/wiki/Distributed_version_control). Short version: your local repository is necessary for when you pull. Committing is also the stage where you can write your changelog.
Pulling
Pulling is how you move changes from your github repository (more generally called the master repository) to your local files. For some reason, Android Studio has an Update Project button. As far as I can tell, this overwrites any local changes, essentially removing any changes since your last push, so it is not recommended you use it. Pulls, on the other hand, take the master repository and compares it to your working directory using the local directory and updates your working directory by either merging or rebasing changes (generally merging them). This is what updates your project.
Pushing
Pushing updates the master repository to match the working directory. It first updates you local repository and uses that to update the master repository. If you haven’t commited and pulled before this, it won’t work. Keep in mind that if anyone else pushes before you push, it may need to merge. However, this generally won’t be a problem. This is what uploads your changes to github.